Tuesday, April 26, 2011
Backsplash Tile and Grout, No Kidding!
And now, a confession...
OK, OK! I misjudged the height of the cabinet and the range hood back when I did the wall repair, so there were some small, visible holes in the wall between stove and hood. I guess I was trying to save money and time by NOT repairing walls that would be hidden behind cabinets. Oops, I missed a spot. Besides, I ran out of patch anyway.
OK, FINE! I also didn't quite paint the wall high enough, then I ran out of paint. Really though, judging paint quantity within two square feet isn't so bad, right?
OK, let's skip the patching and the painting and the sanding and go with a tiled backsplash.
And guess who has done a little tile work and was just dying to add a backsplash to his portfolio?
Redneck Friend!
After taking exact measurements we started by adding a little shim that would act as a stop or a guide to build up from.
Then we taped the area off with painter's tape and scored the wall so the adhesive would hold better.
Then, Redneck Friend used a special tile trowel to spread the adhesive around.
We had a blast doing this, and the jokes were getting out of hand!
"Looking good, Redneck Friend! Oh, and so is the adhesive! Oooooh!"
Redneck Friend almost got a sunburn from the halogens on my vent hood, but we managed to finish up the adhesive without any sunscreen.
The tile that Wife and I liked the most happened to also be the cheapest tile they had at the nationally-recognized home-improvement megastore. We got 2-inch tiles that were stuck together in 12-inch sheets with little squirts of silicone, or something. Two and a half sheets fit across just fine with no tile cutting!
I'm not going to lie: watching Redneck Friend do the tile was super easy! Everything was really coming together.
Redneck Friend: "Man, that's as awesome as... uh..."
Me: "Your mom? Oooooh!"
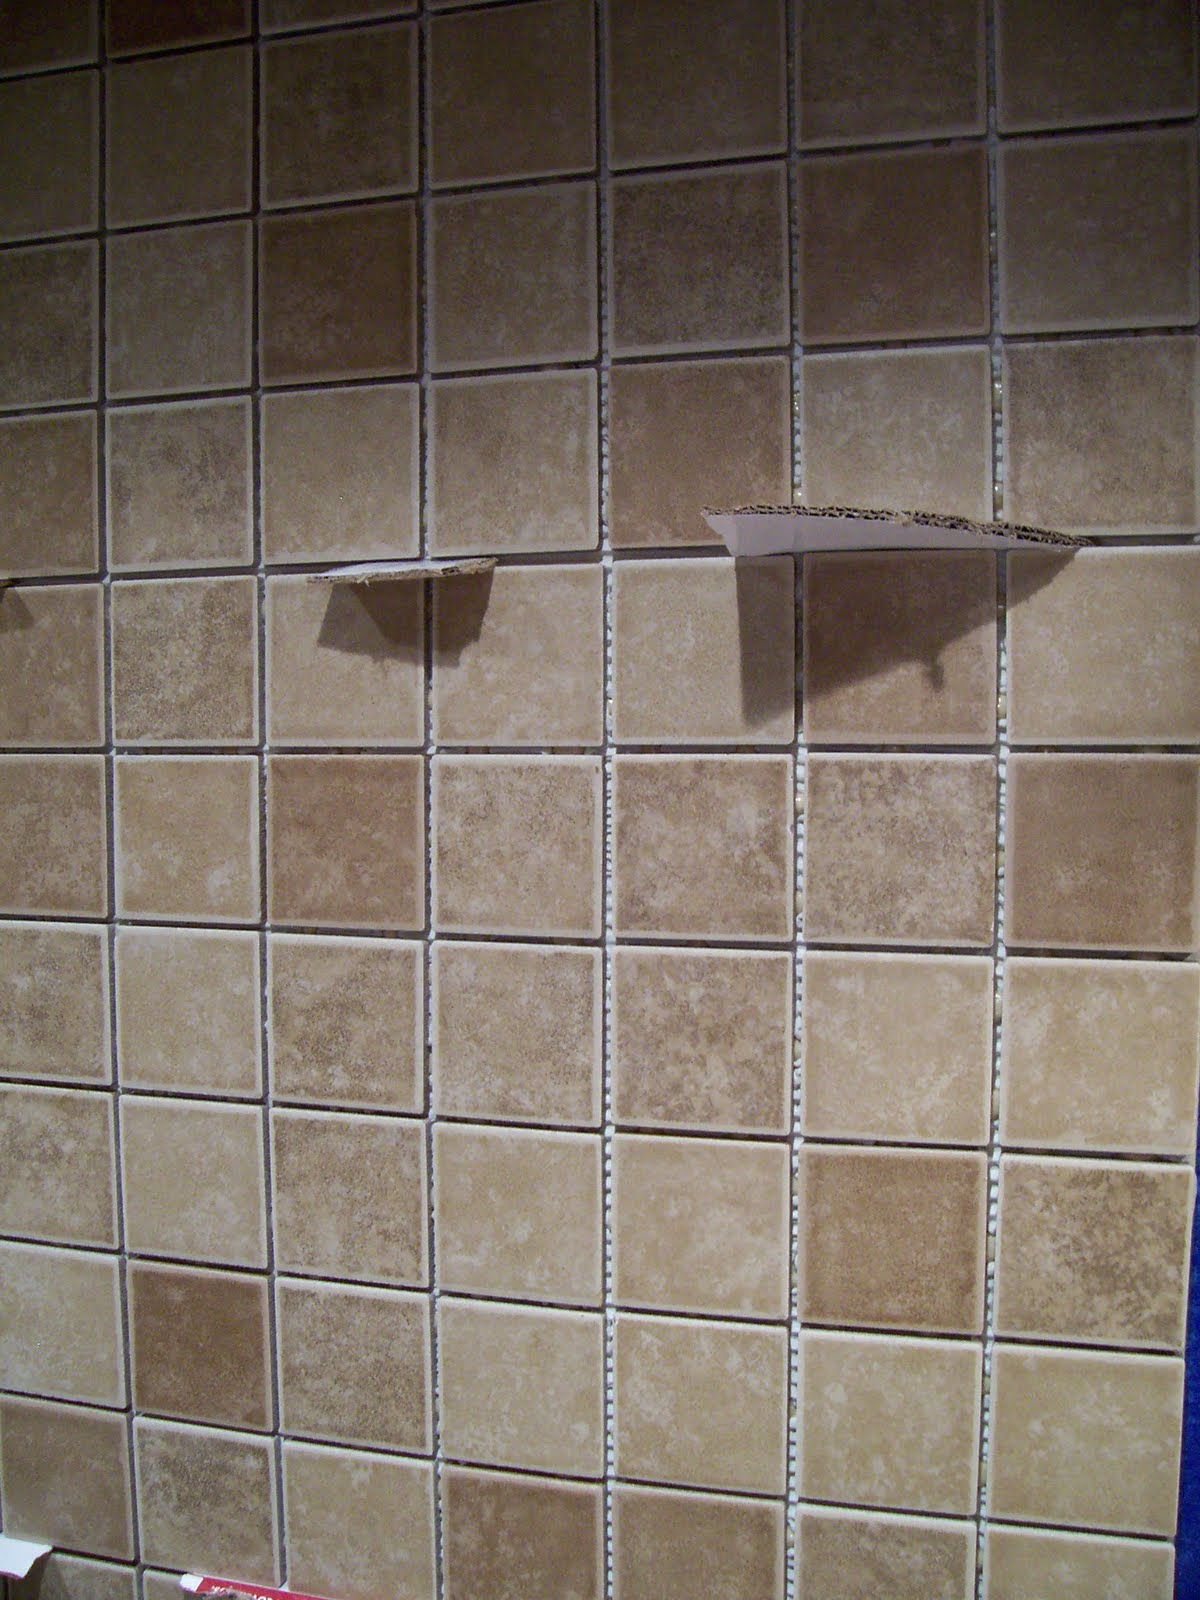
We didn't have any real tile spacers, so we improvised with little pieces of cardboard.
After the adhesive dried (a day or two), we started with the grout. For a job this small, I went ahead and bought the pre-mixed tile grout. It's a little more expensive, but it comes in small quantities and it already mixed to perfection.
This cool grout sponge wiped away the excess. The sponge looked a little like a big piece of cornbread.
Mmmm. Cornbread. Maybe when this kitchen is done I should blog about food. Mmmmm.
Oh yeah, tile.
As you can see from this photo, Redneck Friend is both awesome and taken.
Sorry ladies.
I finished the job with a carefully shaped bead of grout caulk where the painter's tape was. It was like gritty silicone and it helped blend in the edge of the tile with the wall.
After a job well done I fed Redneck Friend all my food and sent him home to the country.
"I'm gonna stick a fork in you, backsplash! Cuz you're done! Ooooh!"
Nevermind.
Monday, April 18, 2011
Man Up=Floor Down
For tons of reasons (cost being #1), Wife and I decided to go with vinyl, self-adhesive floor tiles for our kitchen. The problem is that I have never installed any floor tiles before, so I was a little nervous about doing it alone. I definitely needed some help on this one.
The weekend looked like the perfect time to knock it out, but all the help I had lined up fell through at the last minute.
So now what? I had two options: Wait even longer or man up.
I manned up.
(This is where you go, "Ooooooo!")
Since my old 1949 kitchen walls are slightly banana shaped, it took me a long time (and a few phone calls with Father) to come up with a game plan for laying the tile. But believe me, it was worth it.
With levels, angles, measuring tape, and fishing line I plotted out the exact spot that the first tile would go. If this one had been off, the whole floor would have been off.
I cleaned the floor until it was completely dust free. Until you could eat off of it. Until you could "skate" across it in Father's white tube socks without making them dingy.
After sticking the first tile I worked through one quarter of the room at a time, laying them out as I went.
They stuck really well to the clean subfloor! It went much better than I thought it would, and cutting the tiles was a breeze with a razor knife.
I was careful to undercut the door jams when installing the subfloor, but there was not quite enough room to squeeze a tile under there, too. For the trickiest custom cut, I used a piece of paper as a template before cutting the vinyl tile.
Cut the tile according to the template and...
Booya! A great fit!
There were a lot of edge tiles that needed to be cut, and Wife came to the rescue!
As it turns out, she is an expert as measuring the tile, cutting it, and fitting it against the wall.
After all the vinyl tile was down and pressed to the floor, the finished product was REALLY NICE.
All I can say is, "Take THAT kitchen floor. Take THAT!"
Tuesday, April 12, 2011
Under-Cabinet Lighting Causes Obesity
Our lights are only shining on a pile a dust and tools, but I'm sure my theory will prove true once we are completely moved back in.
Did I say "our lights" just then? Oh yeah!
We have under-cabinet lighting!
Installing under-cabinet lighting was pretty easy, thanks to Father, The Squirrel, Father's electrical planning, Father's six-foot drill bit, and...oh yeah, a hot glue gun I borrowed from IZ.
It's pretty straight forward: we measured, installed the lights, drilled holes up to the attic, and ran the wires up.
I knew I would not be able to sleep at night with the wires that messy looking, so Father recommended a hot glue gun. IZ had one, so I did a drive-by borrowing. He even came out to the car in his famous house shoes to give it to me.
Thanks IZ!
Now doesn't that look better? You hardly notice the wires when you open the cabinet. Now I can sleep better (I know Mr. Vegas is feeling me on this one).
Father showed me how to do the attic wiring, then I showed The Squirrel.
Then I watched The Squirrel do the wiring while I rubbed the cramp out of my leg. I'm done with attics for a while, I hope.
The new light switch by the sink will now operate the under-cabinet lighting. Yes!
The light kit I bought also came with a touch dimmer, so we threw it up too. Works great!
That's one more thing to check off of my list, which is getting shorter by the day...
Monday, April 4, 2011
Plumbing, Pipes, and Pops Helps!
The water pipes under the kitchen floor were a mess. We had a mix of copper and galvanized pipes all spliced together and looped around for no reason. It reminded me of a roller coaster: point A and point B are pretty close, but the loops you go through to get their are CRA-ZY!
We basically pulled out about 30 feet of pipe and replaced it with one 8-foot section.
Look at all this junk we pulled:
Yeah, all that was hanging out under the floor. Yikes!
And get this: the galvanized pipe was so old and corroded that our water pressure was awful. See for yourself:
Gross! (Sorry to have to show you that.)
With the new pipes soldered in place we had a nice straight shot for the hot and cold ready to go.
Thanks to some planning (Father), the right tools (Father), and some know-how (Father), we ran the copper up through the floor and into the new cabinet. Now the dishwasher can be hooked up when it's time.
New braided water lines were attached and a new drain line had to be run for the sink.
Oh yeah, we are excited about the new sink. There were so many fancy ones out there, but we didn't need all that. Since our kitchen remodel is including a dishwasher, we just wanted a standard stainless-steel, single-bowl sink.
Cabinet Guy cut the hole we needed for the sink, so all we had to do was drop it in, fasten the clips, and caulk it like our lives depended on it.
There were about 100 options for faucets, but only four that I was willing to pay for. But I wondered: What would Pops do?
I really wanted Wife's dad, Pops, to weigh in on the decision, so I texted a picture of my favorite faucet right from the nationally-recognized, home-improvement megastore.
The verdict: Pops approved!
And now, we've got water!
Thanks Pops.
Tuesday, March 22, 2011
Welcome to the Hood
Have you ever busted a hole in your wall all the way to your neighbor's house?
I have. Welcome to the vent hood.
Installing this house's first vent hood was a big job; having it vent to the outside was even bigger.
Father brought his arsenal of power tools, The Squirrel (brother-in-law) brought his energy, and I brought enough worry about possible disasters for all three of us.
We started by making shims with a saw and a hunk of wood I found in the shed.
Turned out to be cedar! The shims leveled the bottom of the cabinet so we had something flat to mount the vent hood to.
We marked the new duct hole on the wall, found the center, and drilled a hole straight through EVERYTHING. The drill bit emerged perfectly in a mortar joint on the other side.
Using that hole as a guide we drew the duct pattern on the outside of the brick and used a grinder to cut the edges deep.
Then, we perforated the edge with a hammer drill...
...and chiseled the brick out.
After cutting the inside wall and dropping power from the attic we were ready to dry fit the duct piece.
Wow, there really is a hole in my wall!
The rest of the installation took a little while, but went well.
The outside is really nice! A good and clean job, and well caulked too!
I'll show pictures of the finished product a little later.
Right now, I have some plumbing to take care of...
Thursday, March 17, 2011
Crazy Light, Fan, and The Squirrel
Cabinet Guy came and did an excellent job, but I'll show those pictures at the end of the project.
Time for lights!
Check out this crazy sink light Wife and I picked out:
(I know what you're thinking: "Not as crazy as your awful point-and-shoot photography skills!")
Installation was pretty easy and clean looking.
The warmth of this type of light is just what we were hoping for.
In celebration of our first light switch, we keep turning the light on and off just for fun!
SO, in case you feel left out...
Turn my light on! | |
On | Off |
Admit it: You tried it. And you liked it.
I'm not going to lie: I installed the fan twice. I didn't notice that the first fan was bent, so it wouldn't level properly and scraped the housing. I troubleshooted (or is it troubleshot?), uninstalled it, exchange it, and re-installed. Blah!
Father used his powers to plan the best rafter brace approach. For crawling around in the attic I took my brother-in-law, The Squirrel, up on his offer.
The Squirrel can navigate any crack, crevice, or attic, and he has a good head on his shoulders for building supports and helping me with wiring.
Super happy with this! A huge "thank you" to Father and The Squirrel!
Man, this is really starting to come together...
Monday, March 14, 2011
Primer, Paint, and Cabinet Guy
I had better get on with it.
I thought it would be a lot easier to paint before the cabinets went in so I would not have to tape around them and be so careful.
But first, these walls needed some serious priming.
I put two coats of primer on EVERYTHING:
Then I used a ceiling white for the ceiling, and a two different colors for the walls (daring, I know).
Why paint behind the cabinets?
The colors Wife and I picked are sort of a cream color (same as our living room) and a blue from the slate or country family.
It's working out great so far! We used the cream on two facing walls and blue on the other two facing walls. From the living room looking into the kitchen you see continuous cream that blends nicely. You don't see any blue until you enter the kitchen, so it feels more contained and doesn't clash with the rest of the house.
Now that painting is done Cabinet Guy can come anytime!
"Cabinet Guy? You mean you are not hanging them yourself?"
Correct. I like saving money and doing things myself, but that is too much. Cabinets are not cheap, my plaster walls are hard as a sidewalk, and I am not in the mood to experiment!
We bought our cabinets in an off season for remodels, so they were discounted several times over. Free upgrades, free hardware, free lots of stuff. The labor costs were low and the work come with a warranty, so I jumped on it.
Cabinet Guy it is!